When preparing for a Migration to a New Host, it’s important to understand the logistics around how this move will impact your visitor’s experience. At GSVR, we take extreme care to minimize the potential for outages that would affect your traffic flow as soon as you subscribe to one of our plans.
I Just Signed Up With GSVR – What’s Next?
After you’ve signed up, you’ll be contacted by a migration team member who will help you through each step towards a successful launch. Our migration process is designed to ensure a smooth, timely and successful transition to our platform.
Details around requesting a migration will be provided, which you can initiate securely from our migration request form inside the Support tab of your client area dashboard.
Will I Be Able to Test My Website First?
Many users opt to test their websites before modifying the name servers on their domain to point to our servers.
This allows you to develop the website, whilst the old one runs elsewhere.
Modifying your computer’s Hosts file
This method involves making a small adjustment to your computer’s Hosts file.
Doing this will essentially trick your computer into loading data for a requested site from the server IP address you provide in the hosts file rather than looking up where the domain points to on the internet from it’s nameservers.
Depending on your operating system, the location of your hosts file may vary which we will go into below.
CAUTION: You may not be able to access this file on a public or office computer as it will be locked down. As such this will not be an available option from such a device.
We recommend not using this on a system not owned by yourself.
Windows 7, 10:
You can find the hosts file under C:\Windows\system32\drivers\etc\hosts
To get here quickly from the desktop press your windows key and type in “run” and press enter, this should present something like the below in the bottom left of your screen:

In the box provided enter the following:
C:\Windows\system32\drivers\etc\
and press OK to open the folder containing your hosts file.
You then just need to right click on “hosts” and select “open with”, On the prompt that opens up you should select “Notepad” and then OK.
(If you receive an admin confirmation pop-up, press OK)

It should look something like the below once opened:

At the very bottom of the document below the lines starting with hashes (#) you need to enter the IP address of the server you want your site to load from then the domain name for your site after one space like below:
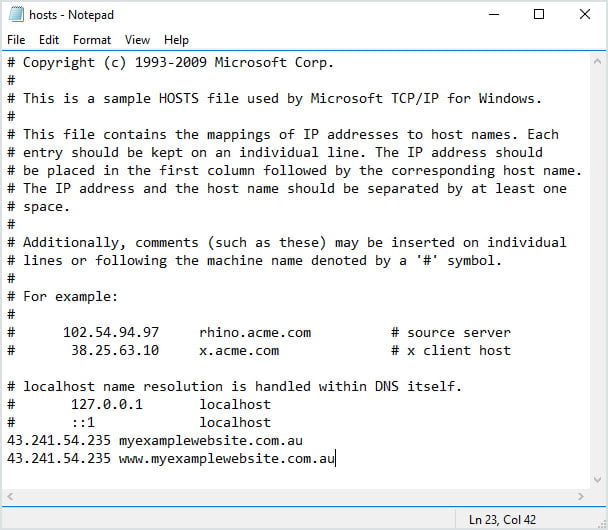
Once this is added you just need to save this document by selecting File > Save, then close it.
Finally close off the host file and open a fresh browser of your choice to test your site, It will now load from the IP address you specified in the host file on this device only, all others will still load from the nameservers that are set on the domain.
Linux and MacOS X:
You can find the hosts file under /etc/hosts
The easiest way to edit this will be with Finder, So open a new Finder window.
- Select Applications from the left sidebar
- Double click on Utilities from the list given in the right side.
- Double click Terminal to open it

Type in the following:
sudo nano /etc/hosts
on the prompt and hit enter.
This will request the devices administrator password to continue. Once the correct password is supplied it will display something like the below:

In this file we just need to add 2 lines, One for your root domain and one for www. Just to cover any type of configuration your site may be using. It should be set as follows:
IP Address domain.name
IP Address www.domain.name

Once complete press “CTRL + O” to commit the changes then “CTRL + X” to exit back to terminal.
When you exit it will return you to the terminal prompt, you will need to run the following command to flush your system network cache to make sure it recognises the changes we just made.
Type in:
sudo killall -HUP mDNSResponder
and then hit enter,
Again, This will request the devices administrator password to continue.
Finally close off the terminal and open a fresh browser of your choice to test your site, It will now load from the IP address you specified in the host file on this device only, all others will still load from the nameservers that are set on the domain.
Do I Need to Worry About Downtime?
Usually we can avoid downtime during this process, although this is primarily contingent upon the nature of your website. See steps and recommendations below:
Basic static WordPress sites:
Static WordPress installs can be migrated without any downtime. In this case, you lower the TTL’s on DNS and freeze any new development prior to initiating the migration process. From there, we do a final content sync just prior to cutover.
GSVR can complete an entire migration including updating DNS or Nameserver by providing us login information to your existing providers member portal.
Complex WordPress sites:
Complex sites that are transactional in nature like a WooCommerce store involve a small maintenance outage (~20 minutes) in order to ensure data integrity with cutting over.
Note: It’s wise to set up a maintenance page during the migration until everything is running properly on our end. The concern lies with customer transactions, if you have a customer purchasing a product, their info isn’t going to be reflected in your GSVR hosted database even though the old site DNS loads fine.
There are a variety of options to choose from in the WordPress repository to display a maintenance page. The Coming Soon Plugin by SeedProd is a popular choice we see used frequently.
Planning Final Cutover
We coordinate a pre-determined time slot as a safety precaution at a time most convenient for your visitor traffic. Generally, we can complete a website migration within one-two days of filing a request. Our engineers will notify you via a support ticket once your site has been transferred over and ready to go!
